Appendix
A.1 Installation and Configuration of Lithium-ion Battery with Modbus Communications
The eSite Modular RMC controller can be configured to read data from a battery monitoring system (BMS) used on a lithium-ion battery bank. The BMS data is used for presentation and high precision control of the battery charge cycles.
All communication to external BMS systems is handled via an RS485 connector, connected to the C7:1 (Data A) and C7:2 (Data B) ports on the RMC front and the corresponding connectors on the battery. The utilized protocol is Modbus-RTU and all data signals and alarms are pre-defined from a Modbus register provided by the battery manufacturer.
The following steps describe the configuration of one of the supported lithium-ion batteries. Note that the settings differ between different battery manufacturers.
A.1.1 Battery Installation
- Follow the manufacturer's installation guide to install the batteries and connect them to the eSite Modular 0 V and -48 V bus bars.
- Connect the battery RS485 (Data A) output wire to the RMC RS485 connector, C7:1 (Data A) (see figure A.1).
- Connect the battery RS485 (Data B) output wire to the RMC RS485 connector, C7:2 (Data B) (see figure A.1).
- It is important to assign a unique Slave-ID to each Li-ion Battery Monitoring Unit (BMU). Note that Slave-ID '1' must be assigned to the BMU with RS485 communication cable connected (the 'main' BMU) and continue in ascending order with the following BMU(s). How to set the Slave-IDs is specified in the manufacturer's manual. In some cases, this is performed automatically by the external BMS.
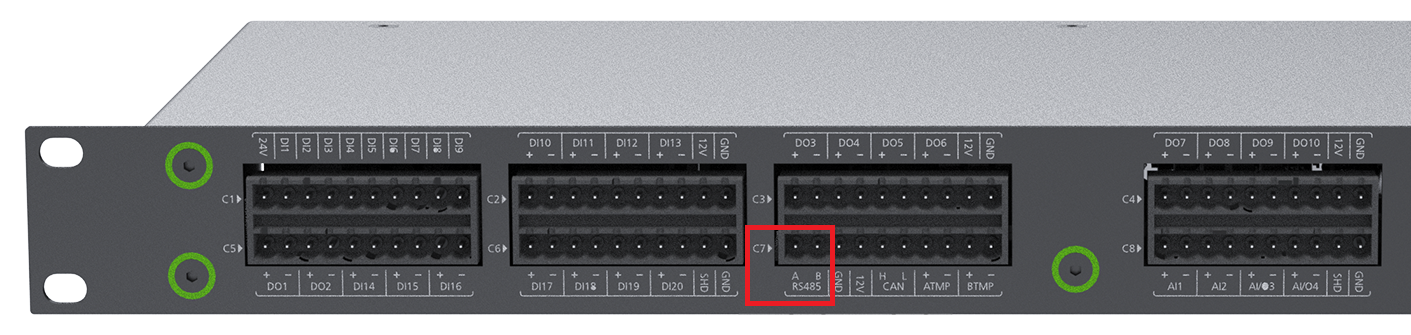
Figure A.1. The eSite RMC front I/O ports with RS485 connections ports highlighted
A.1.2 eSite Modular Configurations
All settings are configured from the local eSite Web under Settings/Modbus Communication. You may find detailed descriptions of the relevant parameters here.
To complete the eSite Modular configuration for Li-ion battery communication, follow these steps:
- Connect to the eSite Modular Wi-Fi named 'eSite + serial' number. See Site Commissioning on how to connect to Wi-Fi.
- Login to the site with the user: Admin. The password is provided by eSite Power Systems.
- Open the Settings page and select the Battery tab.
- Select a battery template for the installed Li-ion battery and press the 'Press to select battery template' button.
- Open the Settings page and select the 'Modbus Communication' tab (see figure A.2).
- Enable communication to Li-ion BMS by selecting the 'ON' setting.
- Set the number of installed Li-ion modules, max number of modules is 16. The eSite Modular system requires that the first module (BMU) is assigned slave-ID '1'.
- Select the Modbus communication protocol from the drop-down menu matching the selected battery type.
- Set the RS485 Baudrate according to the manufacturer's manual.
- After making any changes, restart the Modbus communication by pressing 'Restart'.
- To check the communication, open the Battery page and check the BMU status under the Battery menu tab.
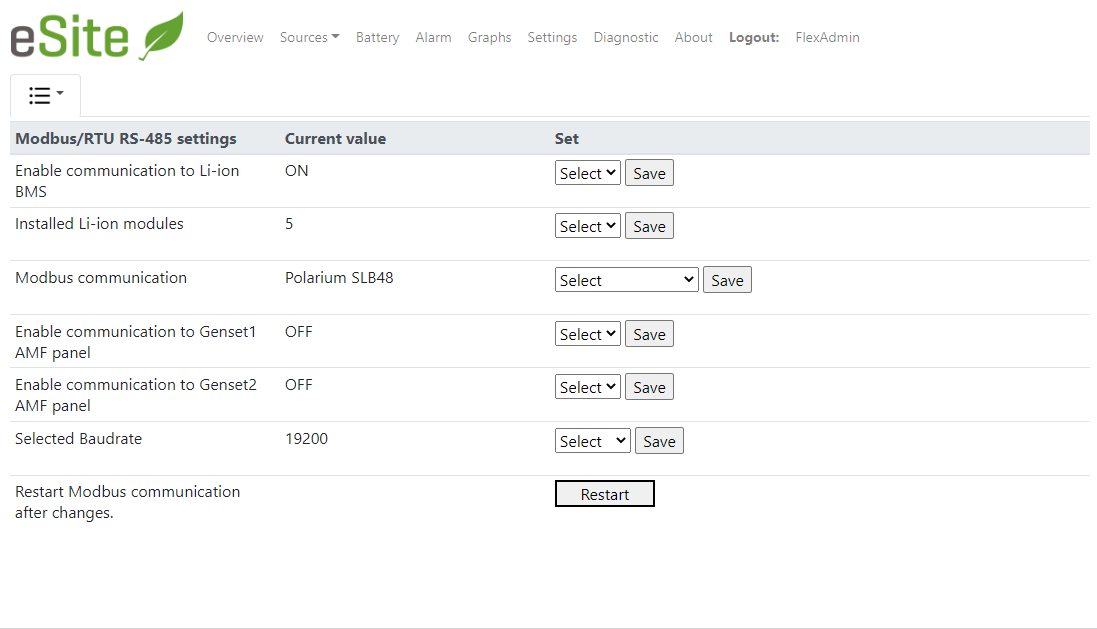
Figure A.2. Overview of 'Settings/Modbus comm' page on eSite Web with example of Li-ion BMS communication settings
A.2 Installation and Configuration of AMF Panel
Many manufacturers of Genset AMF panels can communicate via a serial line (daisy-chain). eSite Modular supports communication over Modbus-RTU protocol half-duplex RS-485. Over this communication, it is possible to read data, alarms and set commands. Two (2) Genset panels can be configured at one site.
All communication to the AMF panel is handled via the RS485 connector, connected to the C7-1 (Data A) and C7-2 (Data B) ports on the RMC front and the corresponding connectors on the panel. All settings, such as baudrate and slave-ID, are configured in the local web Configuration/Modbus Communication pages. You may find detailed descriptions of the parameters here.
ℹ️ Note
If both AMF Genset panel and Li-ion BMS communication is used via Modbus/RTU, the Baudrate MUST be the same.
ℹ️ Note
If both AMF Genset panel and Li-ion BMS communication is used via Modbus/RTU, make sure that the Slave IDs are not in conflict. They MUST be unique.
To configure the Modbus data and alarms requires knowledge of how the AMF panel Modbus register is set up. You may find detailed description of the parameters here.
It is possible to export and import pre-defined AMF-panel configurations by following the steps in the 'Upload Configuration Data' section. Contact eSite Power Systems for support.
Figure A.3 shows an example of the local eSite Web configuration of a DSE-7320 AMF panel. The Baudrate is set to 9600 and the Slave-ID on the AMF panel is set to 16.
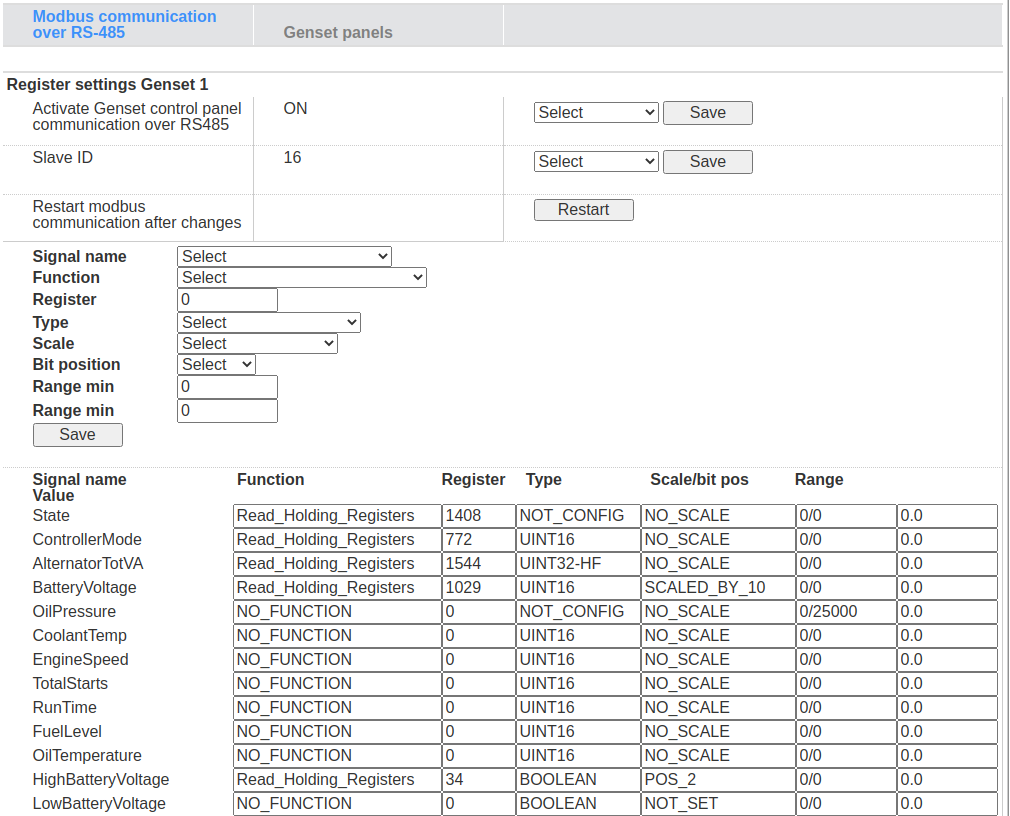
Figure A.3. Genset AMF Panel data configuration.
A.3 System Update
The eSite Modular system includes and supports between 4 and 19 individual controllers which all can be updated with new firmware if needed. All updates are initiated by manual execution via the local eSite Web or remotely via eSite Tools. Remote updates are performed upon request by eSite Power Systems.
A.3.1 Update Main Controller
The main controller is based on the Linux operating system. Before you update the system, always make a backup of the configuration files, see section Backup Data.
- Make sure you have a new firmware file (.rmc, .en4) located on your PC.
- Connect to the eSite Modular Wi-Fi named 'eSite + serial number'.
- Login to the local eSite Web as Admin. The password is provided by eSite Power Systems.
- Press the Settings menu and then the 'System' tab (see figure A.4).
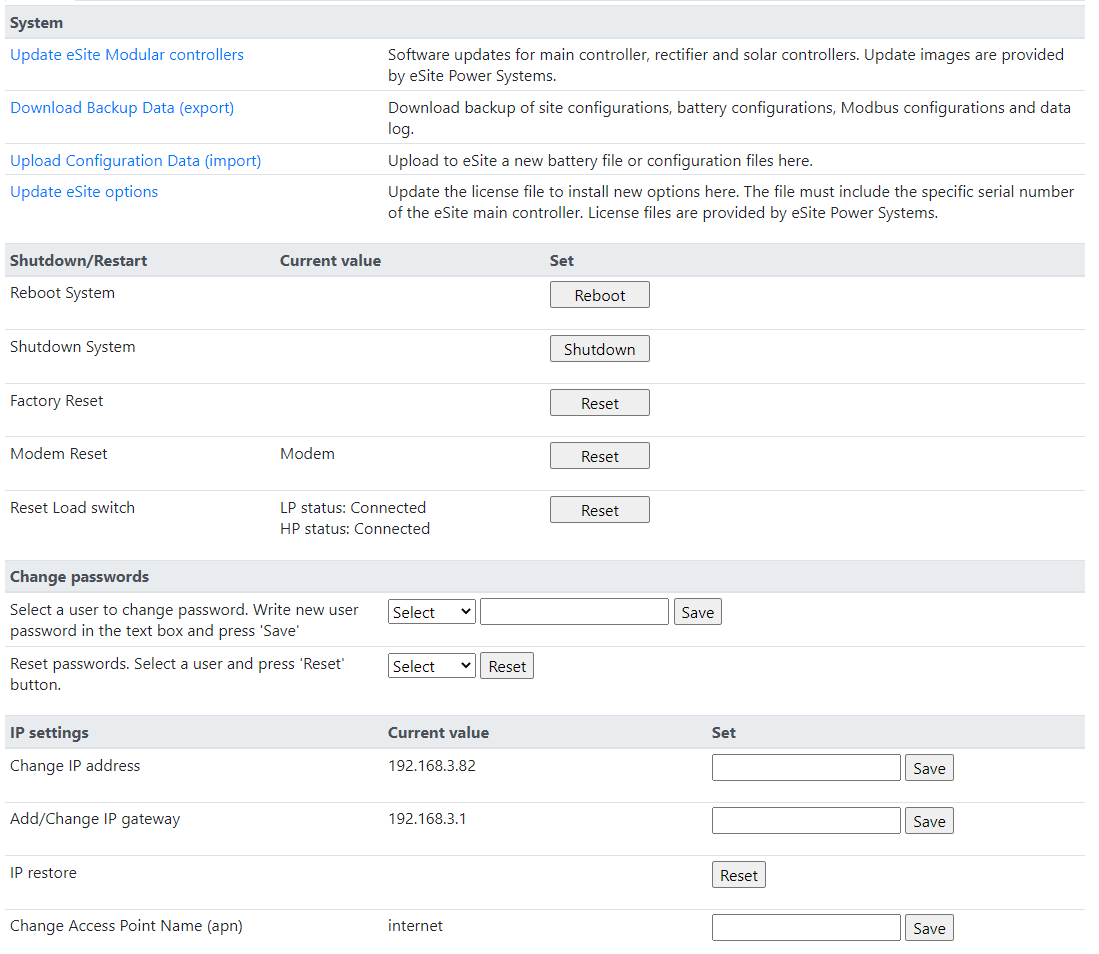
Figure A.4. System tab on eSite Web Settings page
- Press the 'Update eSite Modular Controllers' link (see figure A.5).

Figure A.5. System update page
- On the update page, press the 'Select file' link, choose the update file from your PC and then 'Upload file'. Follow the instructions from the page.
- The update can take up to 5 minutes to process.
- After update, login again and check that the new version is presented in the About page.
A.3.2 Update ACDC/Solar/IO Controllers
Software updates of the micro-controllers are initiated from the local eSite Web in the same way as for the main controller. Update packages may be retrieved from eSite Power Systems.
- The package file name can be anything but must have the extension '.sl4'
- Follow steps 2-6 above.
- Return to System page.
A.3.3 Backup Data
Backup configuration data is useful when sharing data between sites. You can share Battery configurations and Modbus setups. There is also a feature to backup log data.
- Connect to the local eSite WiFi named 'eSite + serial number'. See Site Commissioning on how to connect to Wifi.
- Login to the local eSite Web page as Admin. The password is provided by eSite Power Systems.
- Press the Configuration menu and then the System tab.
- Press the 'Backup Data' link (see figure A.6).
- On the backup page, choose backup type in the drop down, select a name (which must end with .flx) and press download button.
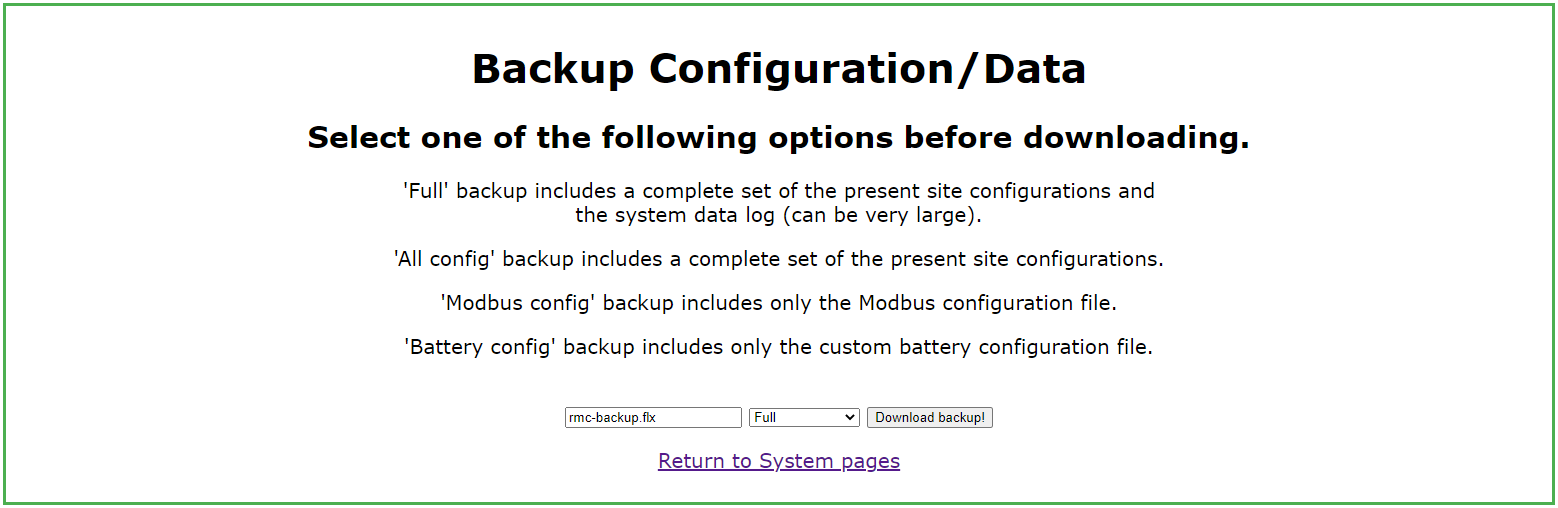
Figure A.6. Backup Data page.
A.3.4 Upload Configuration Data
From the local eSite Web, it is possible to upload a downloaded set of configurations or a configuration file delivered from eSite Power Systems.
- Connect to the local eSite WiFi named 'eSite + serial number'. See Site Commissioning how to connect to Wifi.
- Login to the local eSite Web (192.168.42.1) as Admin. The password is provided by eSite Power Systems.
- Press the 'Settings' menu and navigate to the 'System' tab.
- Press the 'Upload Configuration Data' link. See figure 1.
- In the restore page, select a file by pressing the link, the file (.flx), then press 'Upload file'.
- Follow the instructions from the page.
- Return to system page.
A.3.5 Option File
The eSite RMC controller requires an option file to be installed to enable all desired options. Without installing an option file, the system will operate with very limited functionality. Before performing Site Commissioning, make sure you have retrieved a valid option file (.lic) which includes the serial number of the RMC controller and the options you have purchased.
One single option file can include several RMC serial numbers with different options. Make sure you have the correct file before starting Site Commissioning.
If you are planning to update the firmware, please do so before installing the option file. Follow the System Update guide to update the firmware.
A.3.5.1 Delivery Mode
All eSite Modular systems with the RMC controller will be delivered without any option file installed. When the RMC is powered on for the first time, the system will enter a 'Delivery mode' where the following default options are set:
- Input Source A is set to Grid
- Input Source B is disabled
- Built-in Solar converters are disabled
- Tenant monitoring are disabled
A.3.5.2 First installation of Option File
Upon the first start-up of the RMC controller, the RMC option file is installed during the Site Commissioning (see figure A.7), before registering any unregistered converter units. Please refer to the Site Commissioning guide for complete Site Commissioning instructions.

Figure A.7. Start of Site Commissioning page.
A.3.5.3 Update Option File
Updates of the RMC option file during operation, e.g. due to changes in purchased options, is performed on the 'Settings' page under the 'System' tab.
Press the 'Update eSite options' link and upload the new option file.